A simple tutorial for Git
1. Base Information Configuration
1 | Git config |
1.1. Username Mailbox Configuration
1 | Git config --global user.name 'username' |
Without --global, configuration information for the current project
1.2. View information
1 | Git config --list |
List all configurations
1 | Git config user.name |
Display the specified configuration
1.3. Creating an alias for the command
The git command is very long, it is annoying to complete the input every time, but create an alias for the command.1
Git config --global alias.co checkout
The above created an alias git co for git checkout.
2. Get or create a repository
2.1. Creating a repository locally
1 | Git init |
2.2. Remote clone repository
1 | Git clone xxxxxx |
The latter can specify the folder name
3. Submit an update
3.1. git file status
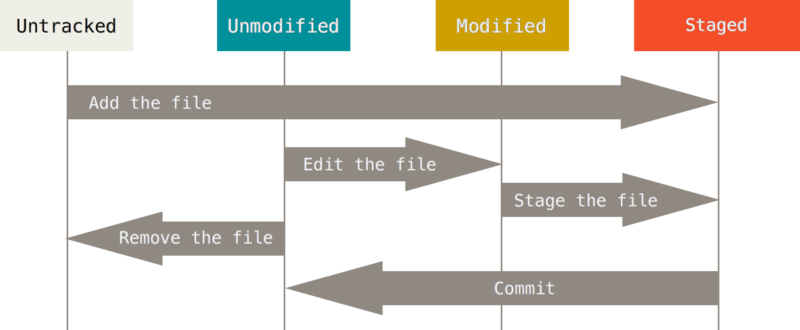
- not tracked
- not modified
- The file that has not been temporarily saved after modification has been modified, and the file will not be saved after the temporary file is submitted.
- The file that has been temporarily saved after the modification has been temporarily saved, and the file will not be saved until it is submitted.
3.1.1. Viewing the status of the current project file
1 | $ git status |
If there are no changes, it will be displayed like this
The information output by git status is very detailed, and git status -s can output more simple and easy-to-read information.1
2
3
4
5$ git status -s
M README.md
A test.md
3.2. Tracking new files git add
If you create a new file in the project directory, such as test.md, run git status again.1
2
3
4
5
6
7
8
9
10
11
12$ git status
On branch master
Your branch is up to date with 'origin/master'.
Untracked files:
(use "git add <file>..." to include in what will be committed)
Test.md
Nothing added to commit but untracked files present (use "git add" to track)
The newly added test.md is displayed as untracked (Untracked). This will not save the file even if you submit git.
It’s easy to track files:1
Git add test.md
The file status will then change to tracked. Submit again will save1
2
3
4
5
6
7
8
9
10$ git status
On branch master
Your branch is up to date with 'origin/master'.
Changes to be committed:
(use "git reset HEAD <file>..." to unstage)
New file: test.md
3.3. Staging the modified file git add
After the file is modified, it will not be saved if it is not temporarily stored. So you need to temporarily save the file to the staging area:1
Git add modified_filename
git add is a versatile command that can be used for tracking and for temporary storage.
It is more appropriate to interpret this command as “adding content to the next commit” instead of “adding a file to the project.”
3.4. Ignore the file .gitignore
Some files don’t need to be added to version control, such as programming intermediate files or caches, so you need to ignore them.
Although these files are not directly loaded with the git add track, they will not be added to the version control system, but the untracked files will be extremely lengthy. You can create a new file called .gitignore to ignore them.1
2*.bin
*.[oa]
All files ending with .bin, and files of .o and .a are ignored here.
The syntax for .gitignore is as follows:
#opening or empty behavior comment/ends with the specified directory/starts with no recursion!starts with inversion and does not ignore- Support for glob (a simplified regular expression used by the shell)
*matches 0 or more arbitrary characters?matches an arbitrary character[]matches internal characters once, such as[ab]matches a or b[az][0-9]matches any character of az once, and so on**matches any intermediate directory, such asa/**/zmatchesa/za/ff/gg/z…
3.5. Submit an update to git commie
If all changes have been temporarily saved, then you can submit1
Git commit
After running, you will be asked to enter an update comment. If you feel too much trouble, you can choose to use1
Git commit -m 'Bug Fix'
To enter information and submit it once
After submitting, the information submitted will be displayed, including the branch, the share-1 value submitted this time, etc.1
2
3
4
5
6$ git commit
Hint: Waiting for your editor to close the file...
[master 41e970250] test modify
2 files changed, 1 insertion(+)
Create mode 100644 test.md
Remember, when you submit, you are taking a snapshot of the staging area. Anything that has not been temporarily saved remains in the modified state and can be included in version management on the next submission. Each time you run a commit operation, you take a snapshot of your project and you can return to this state later or compare it.
3.6. Temporary deposit submission in one go
Every commit must be git add and then git commit is too much trouble. You can use one command to achieve the same effect:1
Git commi -a
This command will automatically add all files that have been tracked** to the staging area.
3.7. Removing files from the project
If you want to remove a file from your project, you need to do two things:
- Remove files
- Remove the file from the project’s tracked file
be usable1
Git rm
A one-time agreement.
If you do not use this command to delete the file directly, the changes to the deletion need to be submitted using git add or git rm.
3.7.1. Can’t remove?
If the file is modified, but there is no commit submission, the file cannot be deleted. (If you do not submit, the content you modified cannot be saved, preventing the deletion from being completely lost after deletion.)
At this point, if you must delete the use of -f:1
Git rm -f
3.8. Moving files
1 | Git mv oldfile newfile |
In fact, running git mv is equivalent to running the following three commands:1
2
3$ mv README.md README
$ git rm README.md
$ git add README
Even if you perform the above three commands separately, Git will realize that this is a change of name.
4. Submit history view
4.1. View the specified submission: via git show
If you want to see a specified submission pass1
Git show submit share-1 value
If the commit is associated with a tag, you can find the commit via the tag.1
Git show v1.0
4.2. git log
1 | Git log |
All submissions will be displayed in order from new to old.
[Common options for git log] (https://bingohuang.gitbooks.io/progit2/content/02-git-basics/sections/viewing-history.html#log_options)
4.3. git log -p -2
Show submitted content differences
-2 shows the last two commits, -1 shows the last time, and so on
You can also restrict the display of the last two weeks, one month, etc., refer to [limit git log output options] (https://bingohuang.gitbooks.io/progit2/content/02-git-basics/sections/viewing-history.html #limit_options)
4.4. git log --stat
If you just want to see the summary statistics submitted, use this
4.5. git log --pretty=xxx
Display the submission history in other formats.
- –pretty=oneline put each commit in one line
- short full fuller
Custom format
Can also customize the format
Such as1
2
3
4
5
6Git log --pretty=format:"%h - %an, %ar : %s"
Ca82a6d - Scott Chacon, 11 years ago : changed the verison number
085bb3b - Scott Chacon, 11 years ago : removed unnecessary test code
A11bef0 - Scott Chacon, 11 years ago : first commit
Specific meanings, refer to:
Https://bingohuang.gitbooks.io/progit2/content/02-git-basics/sections/viewing-history.html#pretty_format
4.6. --graph
Combine --graph to display commit history in ascii graphical form
1 | $ git log --graph |
5. Label Tag
A label that can be submitted to Commit for a .
You can use this tag to mark a submission with a number of tags, such as: v1.0, V2.0
5.1. Listing labels
1 | Git tag |
Can list all the labels
Too many labels can use wildcard filter labels1
Git tag -l "v2.*"
5.2. View the Commit associated with the label
The .com show tagname can be used to view the commit associated with the tag.
5.3. Creating tags for current submissions
1 | Git tag -a V1.0 -m "tag message" #This is creating a complex tag |
Created a V1.0 tag for the current commit
5.4. Creating tags for past submissions
1 | Git tag -a V2.2 COMMIT share-1 value |
5.5. Push tab
Labels are not pushed to the server by default and need to be manually pushed.1
2Git push origin v1.5 # push the specified label
Git push origin --tags # push all tags
6. Branch
What is a branch?
The branch is actually the pointer, which is essentially just a variable pointer pointing to the submitted object. Not a specific line concept.
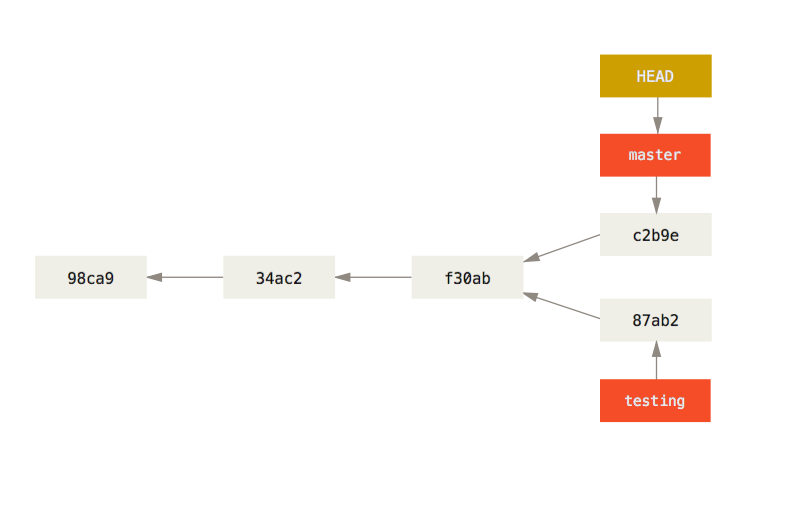
As shown above, there are three commit objects, each of which has an arrow pointing to the parent commit object. Because each commit has its own parent commit, you only need to select the latest commit object to follow the commit object back to the entire commit process.
For example, if we specify the c2b9e commit object, we can know that its parent commit is f30ab, the parent submit is 34ac2, and so on, and we have figured out the direction of the line.
The same is true for 87ab2.
So, the branch is actually a pointer to the latest commit object for these lines. The above picture master points to the line c2b9e, and the testing branch points to the line of 87ab2.
The HEAD pointer points to the current location, which can point to a branch object, such as testingmaster, or to a commit object, such as:f30abc2b9e`
6.0.1. View the Commit object pointed to by each branch
1 | Git log --oneline --decorate |
Use --decorate
6.1. Creating a delete branch
1 | Git branch testing # This creates a branch pointer to the commit you are currently in. |
Git branch -d testing1
2
3
4If it is currently on the branch you want to delete, the deletion will fail.
## 7.2. Switching branches
Git checkout testing1
2
3
4
5
6
7Switch the current branch to `testing` so that the `HEAD` pointer points to this branch.
## 7.3. Creating and switching branches
```bash
Git checkout -b BRANCH_NAME
7.4. Commit commit on branch
The commit on the branch creates a new commit and then moves the branch pointer to the new commit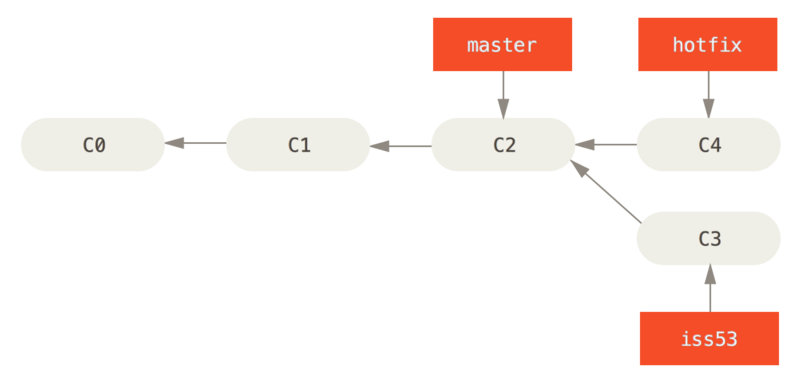
Originally there are three branches on c2, master`hotfixiss53, when commit onhotfix,c4appears, and thehotfixbranch pointer is moved to the top,iss53` Reason.
7.5. Merge branch merge
1 | Git merge target branch name |
Merge the target branch to the current branch.
7.6. Branch merge when encountering conflicts
Sometimes the merge operation will not be so smooth. If you make different changes to the same part of the same file in two different branches, Git can’t clean them cleanly.
A new merge commit is not automatically created at this time. Git will pause and wait for you to resolve the conflict caused by the merge.
These files waiting for conflict can be viewed with git status.
Then open those files, any files that have to be resolved due to the merge conflict will be identified in the unmerged state. Such as1
2
3
4
5
6
7<<<<<<< HEAD:index.html
<div id="footer">contact : email.support@github.com</div>
=======
<div id="footer">
Please contact us at support@github.com
</div>
>>>>>>> iss53:index.html
This represents the version indicated by HEAD (that is, where your master branch is located, because you have checked out the branch when you ran the merge command) in the upper half of the section (======= The upper half), while the version indicated by the iss53 branch is in the lower half of =======. In order to resolve conflicts, you must choose to use one of the two parts split by =======, or you can merge them yourself.
After resolving the conflict, mark it as resolved with git add, then git commit
Fast Forward mode
If the public commit of the target branch and the current branch is the latest commit of the current branch when merging, git will enable the Fast Forward mode, which directly moves the branch pointer to the latest commit of the target branch.
This will be quick and easy.
But after this, the current branch and the target branch become the same line.
Disable Fast Forward
When merging, bring --no-ff1
Git merge --no-ff <target branch>
When the Fask Forward mode is disabled, the merge branch will have a new commit.
7.6.1. Imaged merge tool
1 | Git mergetool |
7.7. Rebaserebase
1 | Git rebase master # rebase the current branch to the master |
Merge the current branch rebase onto the master branch.
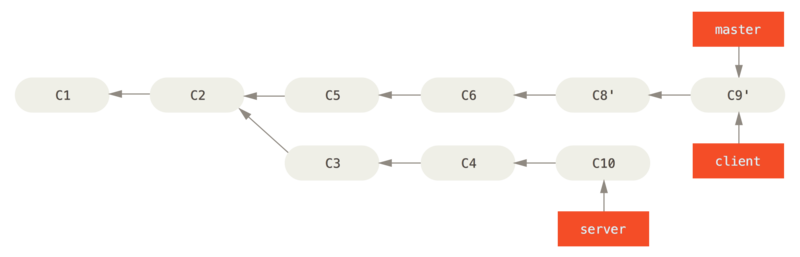
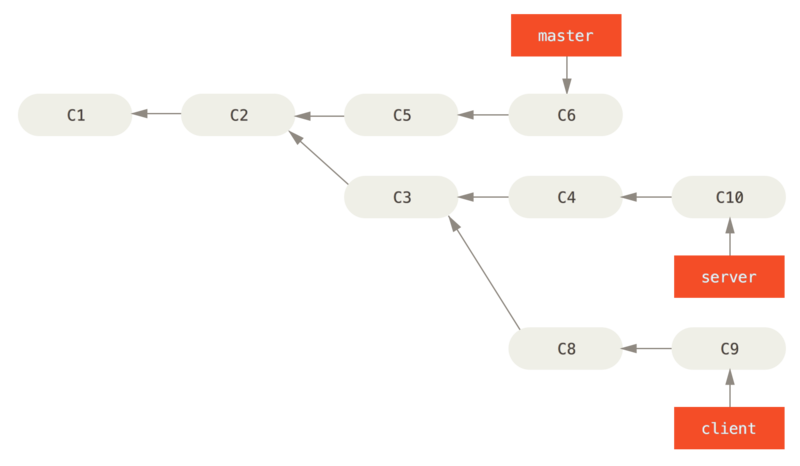
Use rebase as shown in the server branch.1
Git rebase master

As you can see, the new c3', c4', c10' commits appear on the master branch. This means that changes to the file are submitted in accordance with c3 c4 c10, changes are made to the c9’ commit, and the server branch pointer is moved to the last c10’.
7.7.1. –onto Usage
If you use the command for this project:1
Git rebase --onto master server client
Means: “Remove the client branch, find the modifications after the common ancestor of the client branch and the server branch, and then repeat them on the master branch.”
final effect: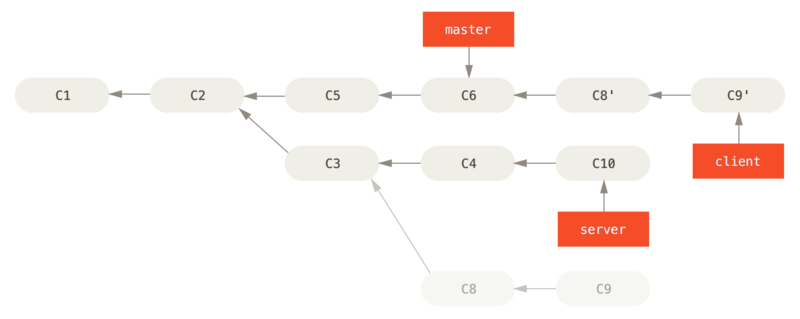
8. Undo operation
8.1. git commit --amend Modify the last commit
After submitting, I found that I missed a file and did not submit it. What should I do?1
2$ git add forgotten_file
$ git commit --amend
--amend means to modify the last commit and merge the current changes into the last commit, which is equivalent to patching the last commit.
8.2. Deleting files from the staging area
Modified the file, use git add to add the changes to the staging area, how to cancel the changes from the staging area?1
Git reset HEAD FILENAME
This command will delete the development file from the temporary storage area.
8.3. Undoing changes
I modified the file, but I regret it. I want to restore the file to what it was before.1
Git checkout -- FILENAME
This command will ignore your modifications to the specified file and overwrite it from the last commit.
This order is very dangerous
8.4. Recover deleted branches
If you know the share-1 value of the commit that the branch originally points to, you only need to create a branch with the same name for the commit again.1
Git branch <branch name> <the hash value of the commit pointed to by the branch>
If you don’t know share-1, use reflog1
Git reflog
#远程仓库
Remote repository is a non-local and current repository does not matter another repository ** (in fact, the remote repository can also be local, as long as the repository is not related to the current repository is considered a remote repository)
Think of the current project repository and remote repository as two independent, unrelated repositorys will be better understood
There are many commits and branches in the local repository, and the remote repository can have no data. Unless you upload the specified data to a remote repository. The reverse is also the same.
If you want to associate a remote repository with a local repository, you need to use git remote add
Adding a remote repository to a project
1 | Git remote add origin git@github.com:xxx/xxxx.git |
Reference to remote repository
A remote repository has been added above with the address `git@github.com:xxx/xxxx.git`.
To push data to this remote repository or to get the code in the repository is only needed1
Git push git@github.com:xxx/xxxx.git
This is to push the code to the specified remote repository, but it is too much trouble to enter the complete address each time, so we can give this address a unique name to remember, the place where the alias is specified is the one above.1
Git remote add origin git@github.com:xxx/xxxx.git
origin is an alias for remote repositories. Origin has no special meaning and can take any name. The origin is taken here simply because everyone is using this name, and it is also the default name of git, everyone is used to it. I am too lazy to change.
After defining the alias, referencing the remote repository and branch becomes1
2Origin
Origin/branch
fetch Get the latest information on remote repositories
After the code is cloned from the remote repository, if someone updates the remote repository, the local remote repository commit code is old, you can get the latest code through fetch.1
Git fetch origin
At this time we just grabbed the latest code data from the remote and did not apply the latest code to the working directory. To apply the code you need to use merge to merge the remote repository code** into the local.
1 | Git merge origin/master |
Why not use
git checkout origin/masterIf we use
git checkout origin/master, sinceorigin/masteris a remote branch, it will not change. Because the remote branch is only pushed throughgit push. So the result is that ifcheckoutis onorigin/masterand the update is submitted above, then this update will not be subordinate to any local branch, which will cause the commit to be lost after cutting to another place.
Or create a local branch on the origin/master branch:1
2
3
4
5
6Git branch myb origin/master
Git checkout myb
Or
Git -b myb origin/master
This usage refers to the syntax created by the previous branch. This creates a local branch myb pointing to origin/master with the commit object.
Tracking branches and pull
Every time we update the code remotely, we have to fetch it down and then merge it with merge, which is very troublesome.
There is an easy way to do this all at once, that is, to associate a local branch with a remote branch. Getting data from the local branch is automatically merged.
Tracking branch
The local branch and remote branch association methods are the above1
2Git branch myb origin/master
Git checkout myb
This local myb branch is associated with the remote origin/master branch.
Or can be simplified to1
Git checkout --track origin/master
The local master branch is automatically associated with the origin/master branch.
Change the remote branch associated with the local branch, using:1
2Git branch -u origin/dev
Git branch --set-upstream-to origin/dev
When the trace branch is set, it can be referenced by the @{upstream} or @{u} shortcut.
List tracking information for all branches
1 | Git branch -vv |
git pull
git pull = git fetch tracked branch + git merge tracked branch
Push
We don’t want to push all the branches and commits in the local repository to the remote repository when pushing.
So when you push, we have to specify what to push to the remote repository.
1 | Git push remote repository local branch name: remote branch name |
This code function is to push the local mster branch to the master branch of the origin remote repository.
If you want to customize the branch name of the remote repository1
Git push origin master:lululu
This is to push the local mster branch to the lululu branch of the origin remote repository.
Deleting branches in a remote repository
1 | Git push origin --delete serverfix |
Removed branch serverfix on the server
Push tab
By default, the git push command does not pass tags to the remote repository server. After creating the tag you must explicitly push the tag to the shared server.1
2
3Git push origin v1.5
Git push origin --tags # This will transfer all the tags that are not on the remote repository server.
Github use
Create ssh key
1 | Ssh-keygen -t rsa -C "youremail@example.com" |
After returning all the way, two files id_rsa and id_rsa.pub will be generated in the personal directory.
Github Add ssh public key
In the github settings, paste the id_rsa.pub public key into it.
Testing ssh links
Whenever git’s ssh link is used, the private key id_rsa private key in the .ssh directory is automatically called.1
Ssh -T git@github.com
9. Appendix
9.1. The underlying object
A Commit corresponds to a commit submission object. There are several small objects under this submission object.
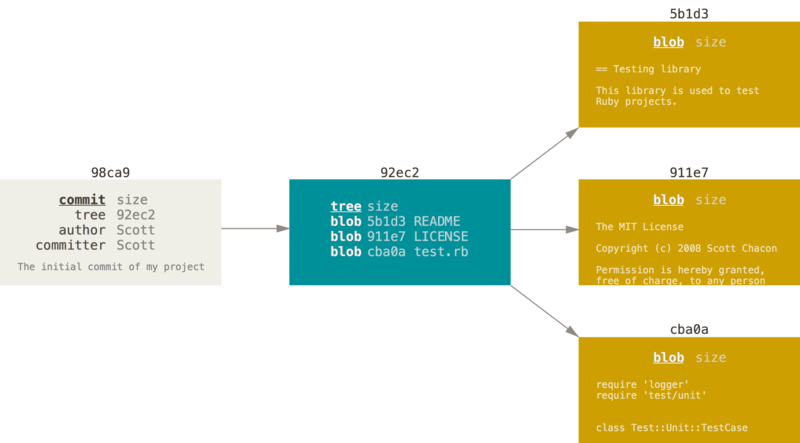
As shown, a commit object contains a tree object to record the directory structure of the following file snapshot.
A tree object records a bunch of blob objects (the blob object is a file snapshot).
The above image is the first commit when creating the project, there is no parent commit object.
The commit after the first commit has a parent object, as shown in the figure: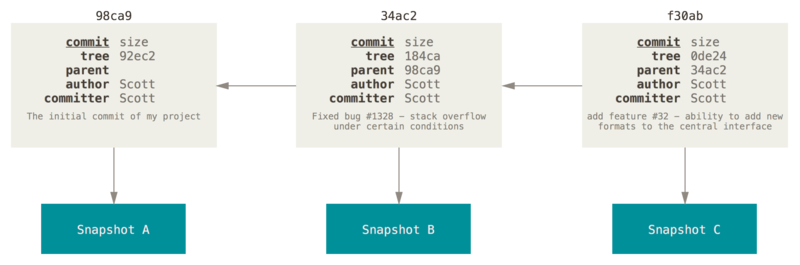
10. Others
git ignore specific files
Https://hiberabyss.github.io/2018/03/03/git-ignore-specific-file/